...
There are clients for Windows, OSX, AppleIOS Apple IOS (in the app store), Android (Google Play Store) and Linux below
...
USE PORT 10443
Download the SSL Vpn clients for Windows, OSX and Linux below. Use only these versions as they are tested to be stable
THE USER MUST BE ADDED TO THE DistrictVPN (ie. ADMVPN, CLKVPN, etc) group in the district's domain. This group is a member of REMC1MemberVPNAccess at the root of the forest adremc1.org which is located in the ManagedServicesGroups OU. It may take up to 30min for replication to occur before you can add the user.
The TSL 1.1 and 1.2 security protocols must be enabled (usually is by default), otherwise the connection will fail at 40%. The setting for that in WIndows Windows is under Internet options→Advanced. You can access Internet Options through either the Control Panel or through Internet Explorer.
OUTSIDE VENDORS OR ENTITIES ONLY CONNECTING IN → must be given a LOCAL FORTIGATE USER and added to the REMC1-District-Ipsecvpn-SSLvpn group (Or a group that is made especially for the vendor for limited access)
OUTSIDE VENDORS OR ENTITIES ONLY CONNECTING IN → If they only need DMZ access then only add them to the DMZvpn group on the fortigate. You can create other groups which will limit vendors to other areas. This is mentioned in the SSLvpn configuration wiki.
ONLY FOR REMC1 Employees→ REMC1 EMPLOYEES ONLY MUST BE ADDED TO THE REMC1VpnUsers user group in the REMC1 domain
...
YOU MUST HAVE AN ACTIVE INTERNET CONNECTION TO INSTALL THIS CLIENT
Download and install 'FortiClientVPN7.0.8.msi'
Run the install. Installation may require local admin privileges. At one point the install MAY download updates from fortinetFortinet. THIS MAY PAUSE FOR EVEN 10MIN AT 0% you must be patient it will continue if you have an internet connection
After running the install you should see a red shield on your desktop titled ForticlientFortiClient. Run this by double clicking

You will get a Forticlient FortiClient Console window. Select the 'Remote Access' tab and click the blue 'Configure VPN' link in the center of the white area (see picture below)

Provide a connection name
The Remote gateway is fortigate.remc1.net for most individuals including Supportnet SupportNet members, vendor, or other outside party. Otherwise please email or call support@remc1.net / 9064877624 to ask what the endpoint address is for your entity
Vendors and other 3rd parties require a user/pass to be added to the fortigate FortiGate directly and provided to the vendor/3rd party (see step 10)
Put a check in the customize port box and enter 10443
Optional: Click the 'Save Login' radio button and in the Username Field type in your username. This will be your email address e.g. ekemppainen@remc1.org.
If you are a vendor REMC1 will supply you with your username. Contact REMC1 Support if you are unsure of your full username at 9064877624
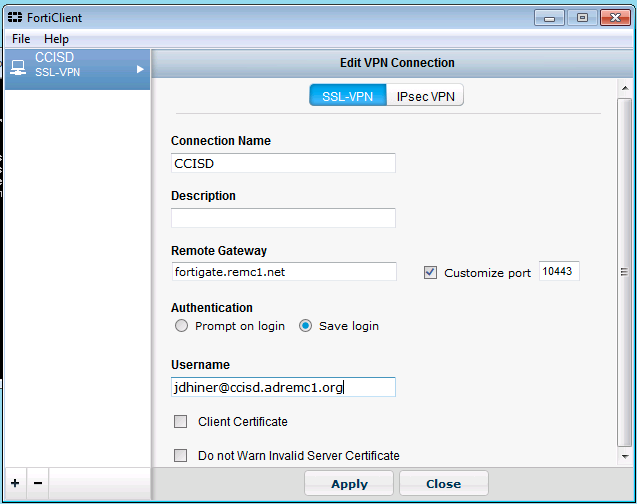
Click 'Apply'
...
Wait for a notification telling you that the settings were restored.
Open the Forticlient FortiClient console.
Accept the EULA.

Make sure the individual's account is in the VPN group in active directory listed above. If this is an organization that doesn't have a domain connected to the Fortigate FortiGate proceed to making a user in the Fortigate FortiGate for them.
You are ready to go. Enter your username (UPN if you are in the forest) and password.

...
You should see a red shield on your desktop titled ForticlientFortiClient. Run this by double clicking. Alternatively, you may see a green shield in the lower right taskbar. Right-click on that and select 'Connect to (whatever you named your profile)'. See the pictures below


Type in your username (if you didn't set it up to autofill auto-fill in the steps above). This will be your email address. eg: jsmith@ccisd.org or djohnson@hpts.us. If you are a Vendor: Contact remc1 if you are unsure of your full username
Type in your NETWORK login password. This will be the same password used to log into your work computer and your email. It's all one login. If you are a vendor or outside entity/non REMC1 member then REMC1 will supply you with the password
Click 'Connect'. If you receive a certificate warning (you shouldn't unless you used the IP address instead of fortigate.remc1.net as the remote gateway) accept the certificate to finish the connection

Remember to disconnect when you are done
To disconnect double click on the Forticlient FortiClient shield icon on your desktop and then click 'Disconnect' in the window that pops up OR right click on the green Forticlient FortiClient shield in your taskbar and select disconnect (see picture below)

or

...
Download the OSX client below and double click on the download. It will mount as a drive. You must open the finder and click on it like a disk drive and run the forticlientupdateFortiClientUpdate.app as shown in the screenshot below.

A window will pop up. Click 'Continue', then 'Continue', then 'Agree to the license' (if you are UPGRADING then you will not see that step) then click the 'Customize' button on the lower middle part of the window (see screenshot below)

IMPORTANT NOW UNCHECK OTHER COMPONENTS or it will install a slew of annoying garbage such as webfilter, antivirus etc. which you don't need
Click the 'Install' button and finally the 'Close' button
On the top OSX Menu Bar click the Black Shield and select Open Forticlient FortiClient Console OR Go to your Finder then click 'Applications' on the left side of that window then on the right side double click on the Forticlient FortiClient icon with the Red Shield red shield (see pictures of both methods below).

or
Once open, click the 'Remote Access' tab on the left side of the window then the gray gear icon on the right part of the window and select Add New Connection (see picture below)

Select the SSLvpn radio button on top
Name your connection: eg: CCISD or Hancock Schools or REMC1
Remote Gateway: fortigate.remc1.net
Click 'Customize Port' and type in 10443
Click 'Save Login' checkbox

Type in your username in the Username field. This will be your FULL USERNAME which designates what district or entity you are employed with. e.g. eg: jsmith@ccisd.org or djohnson@hpts.us. Contact remc1 if you are a vendor/outside entity or are unsure of your full username.
Click the 'Add' button at the bottom right
...
On the top OSX Menu Bar click the Black Shield and select 'Open Forticlient Console' OR Go to your Finder then click 'Applications' on the left side of that window then on the right side double click on the Forticlient icon with the Red Shield (see pictures of both methods below).

or
When the window pops up make sure your correct VPN Name is selected
Type in your username in the Username field. (skip if its already there and saved in the config from the initial setup) This will be your FULL USERNAME which designates what district or entity you are employed with. eg: jsmith@ccisd.org or djohnson@hpts.us . Contact remc1 if you are a vendor/outside entity or are unsure of your full username.
Type in your NETWORK login password. This will be the same password used to log into your work computer and your email. Its all one login. If you are a vendor or outside entity/non REMC1 member then REMC1 will supply you with the password.
Click 'Connect'
Remember to disconnect when you are done. To disconnect, click on the shield in the top menu bar as explained above or double-click the Forticlient FortiClient red shield in Applications and click 'Disconnect'. Screenshots for both methods are already included above
...
Available in the app store. Titled ForticlientFortiClient. I recommend just using the built in ipsec feature of IOS but the SSLvpn forticlient FortiClient option does work well also. The settings are the same as explained above.
...
Available here: https://play.google.com/store/apps/details?id=com.fortinet.forticlient_vpn&hl=en or search for fortinet FortiNet in the google play storeGoogle Play Store.

Client Downloads
Windows: FortiClientVPN7.0.8.msi
MacOSX Client: FortiClientVPNOnlineInstaller_7.0.dmg
Linux 64bit Generic Client: forticlient_vpn_7.0.7.0246_amd64.deb
Android: FortiClient VPN Version 7.2.0
...